BIO、NIO
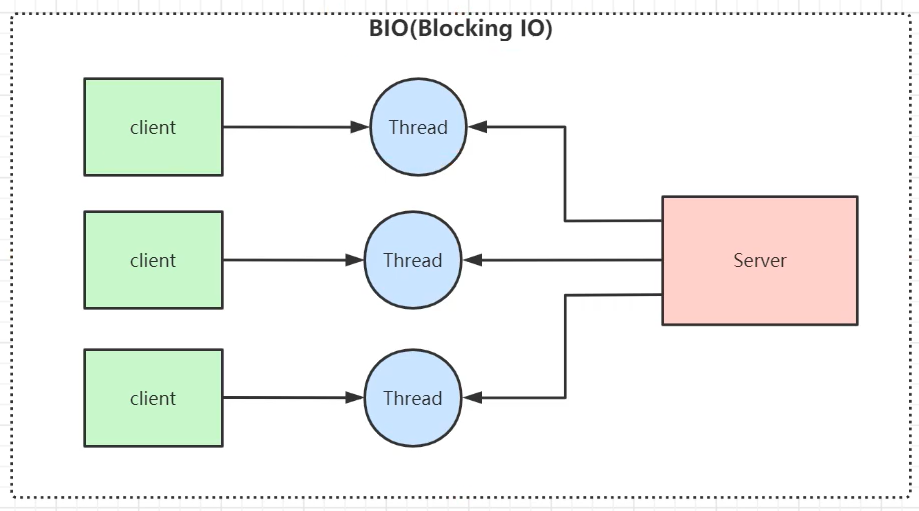
BIO
同步阻塞IO
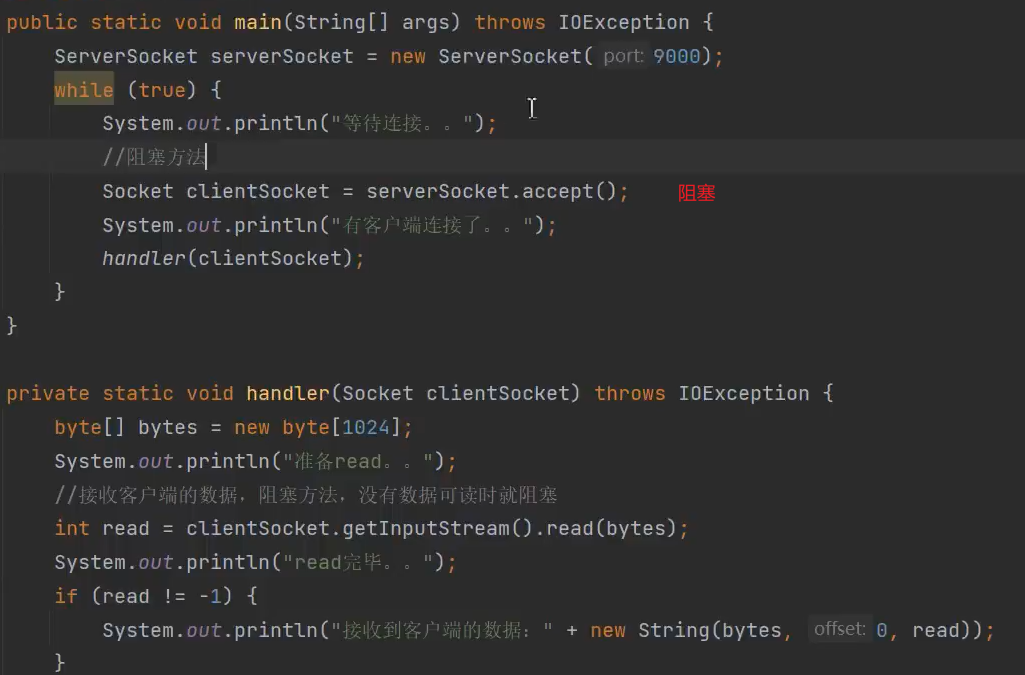
每个连接对应一个线程,改用多线程/线程池执行还是容易达到最大并发量的瓶颈,并且如果请求并没有发送数据,还是占用资源,优点是简单。
NIO
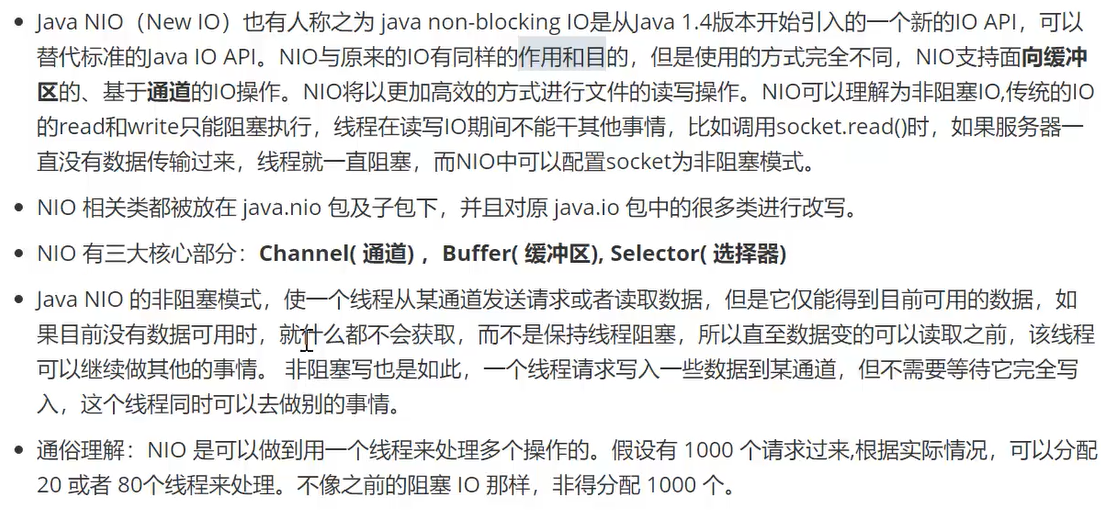
non-block io 同步非阻塞IO
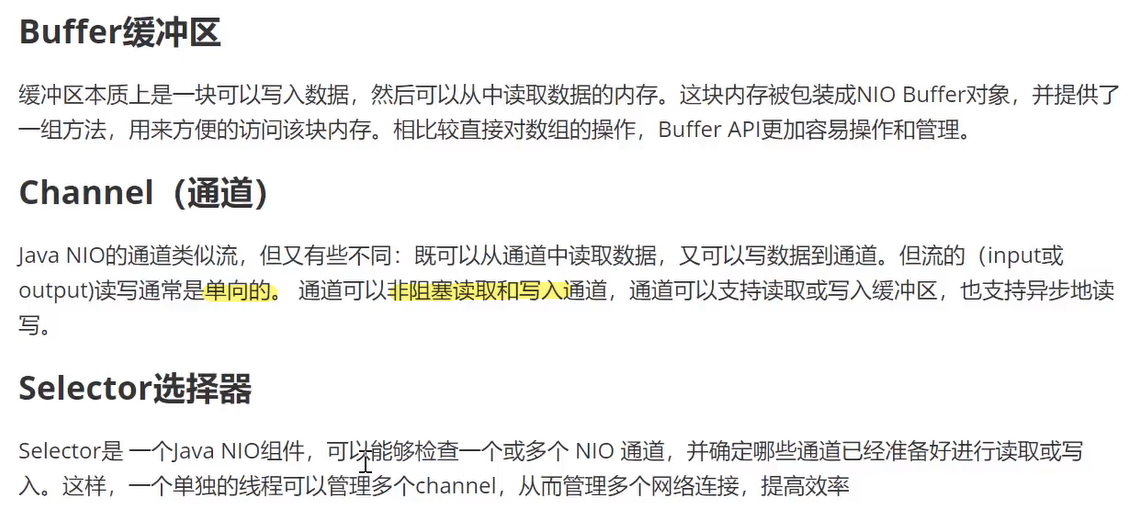
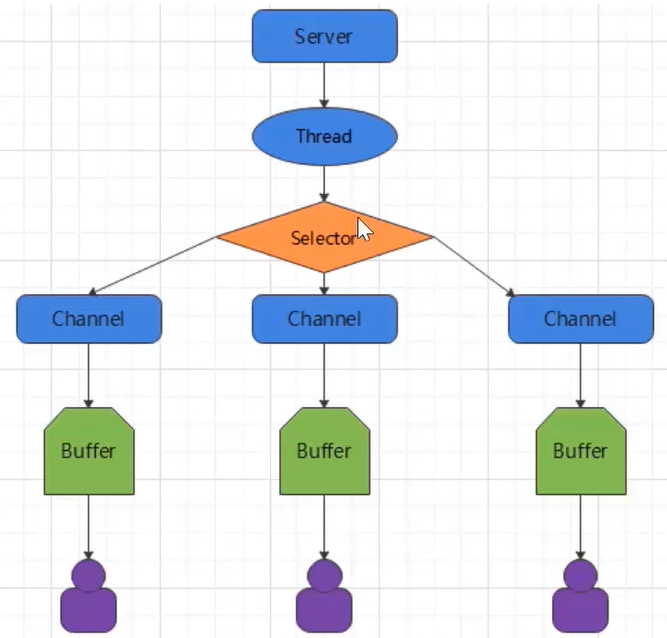
三大核心:
AIO

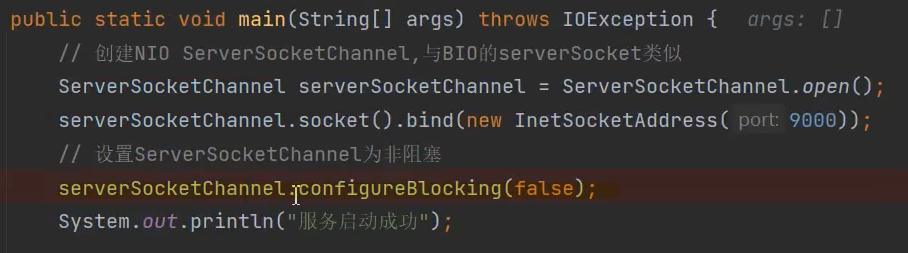
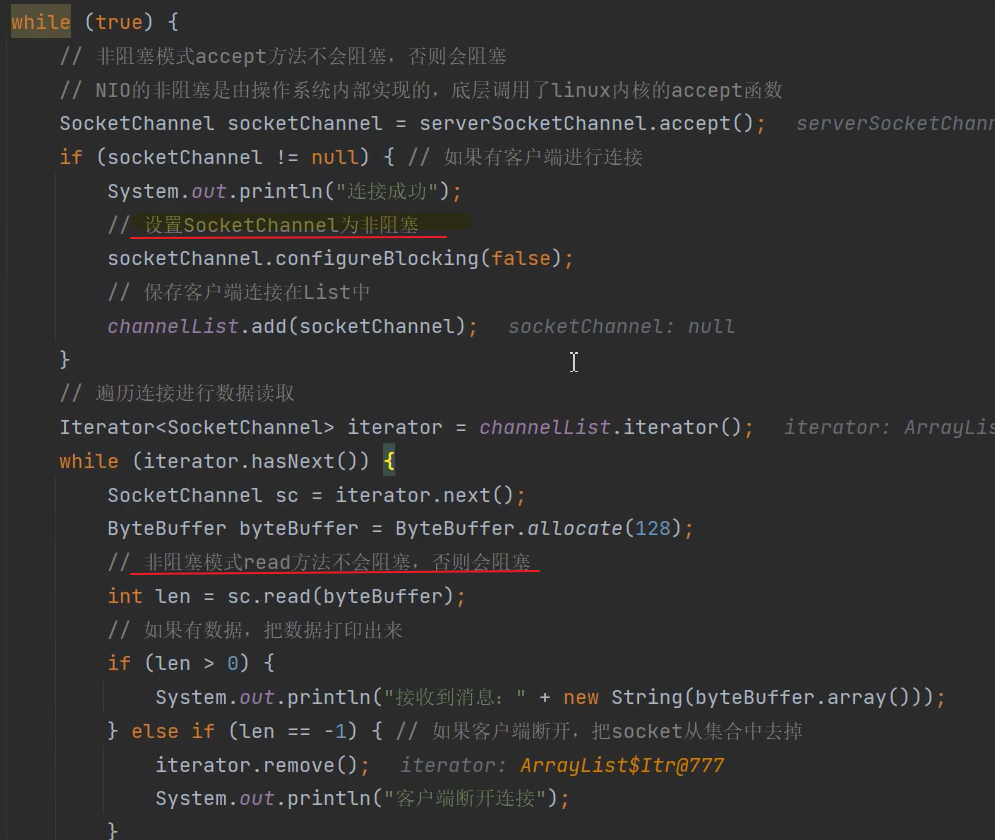
相对于BIO,NIO在接受请求连接、处理空连接(无数据的请求)设置为非阻塞,这就是高并发的前提。线程模式为一个线程处理多个请求。
以上代码的问题:
1、死循环使得没有请求时CPU占满;
2、十万个连接放到 List ,但是其中仅少量的连接有数据,大量无效循环;
3、如果有上万个事件,每个事件执行时间很长,就会影响后面连接的建立;
解决:
1、先阻塞线程,等到有accept时放行
2、增加有数据的List,循环遍历
3、交给线程池来处理事件,主线程只接收请求连接。(redis没有用多线程,还是单线程,但它会限制每个事件的执行时间,不能太长,虽然它io收发可能是多线程的,但事件处理还是单线程)
selector解决了这两个问题!!
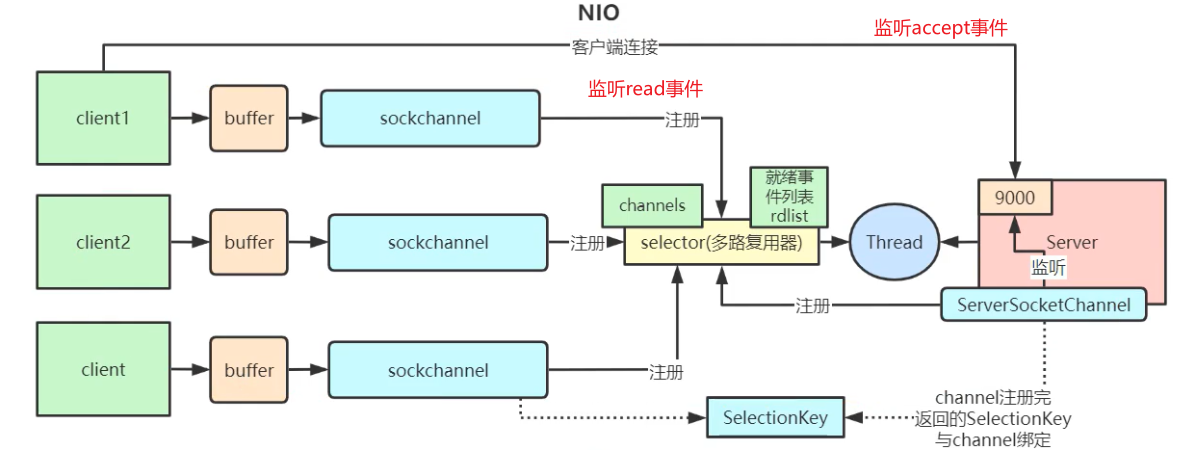
引入selector多路复用器
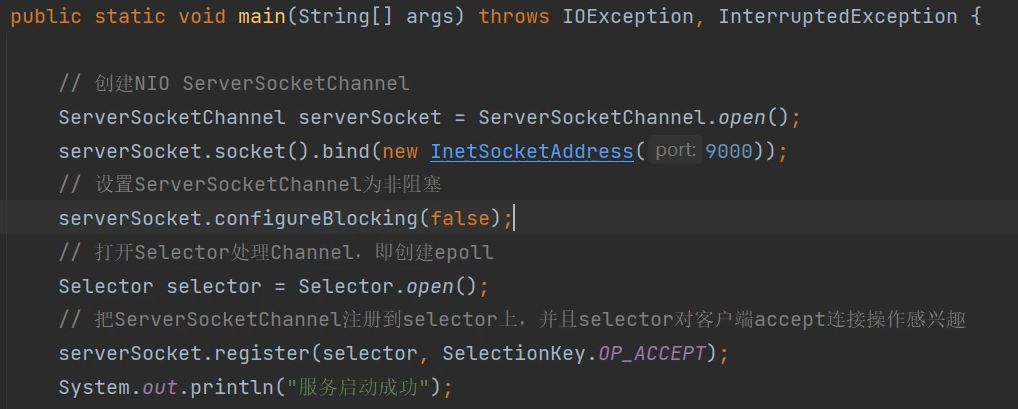
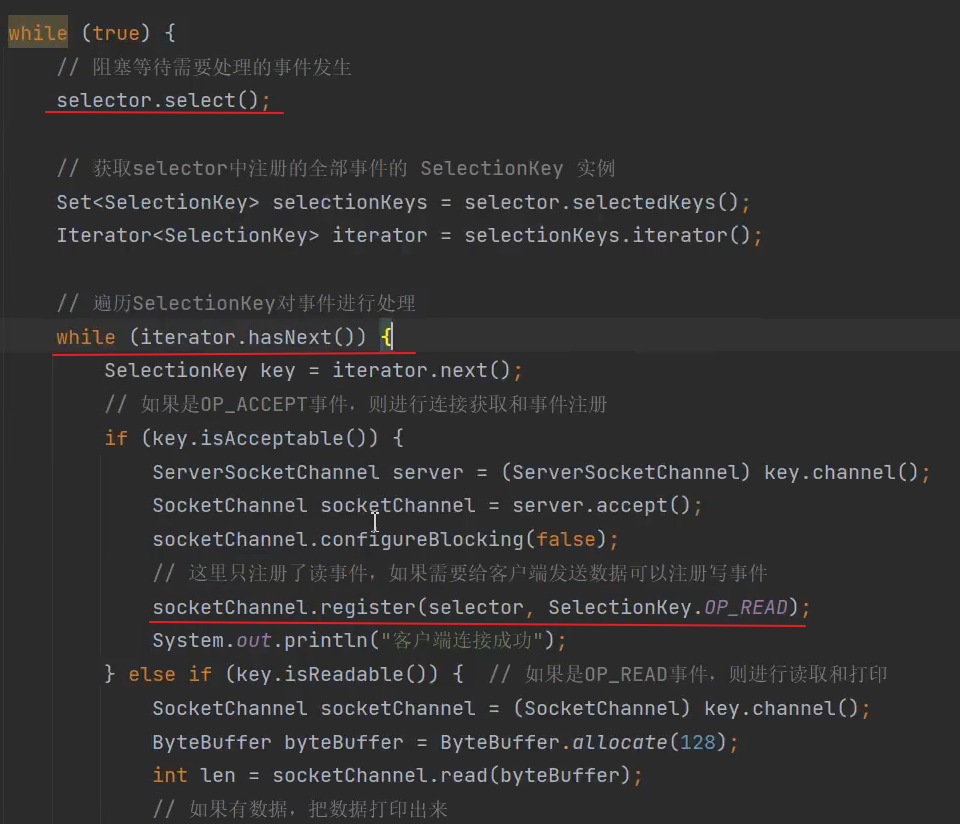
过程:
把serversocket 注册到 selector ,并监听 accpet 事件;
循环中,无请求时阻塞,让出CPU,有请求时selector.select()放行(解决1)
循环selector.selectKeys(无数据的连接不会被获取到,也就不会被遍历,解决2)
判断如果是accept事件,注册这个serversocket的read事件到selector;
如果是read事件,就执行自定义方法;
接着循环阻塞。
底层:
open()、select()、register()
Selector.open()底层实现基于不同平台,linux下,实际调用返回的是EpollSelector,其中放着一个集合EpollArrayWrapper,保存着channel,最终是native本地方法实现的,操作系统的内核函数epoll_create(创建epoll实例)、epoll_ctl、epoll_wait
所以selector底层就是一个epoll结构体,包含channels集合,监听其中的事件,有事件发生时就放到就绪列表rdlist中。
redis底层也是通过epoll函数实现的。
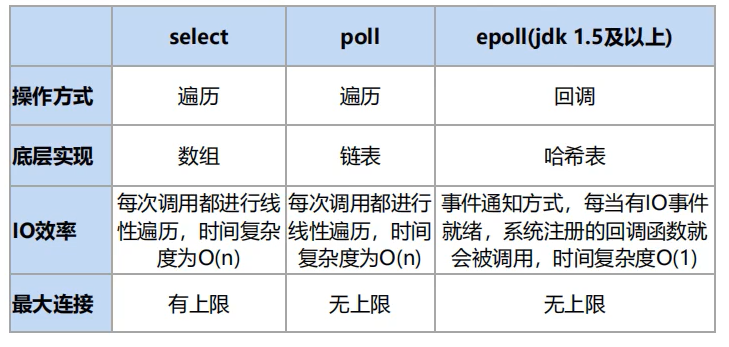
IO多路复用底层主要用的linux内核函数select、poll、epoll:

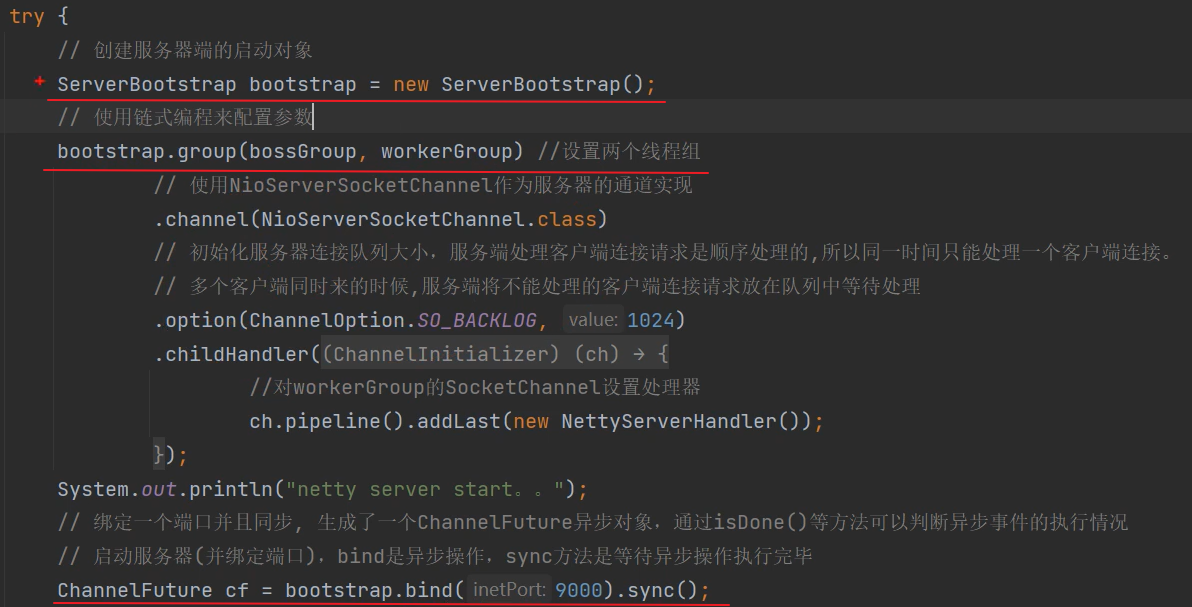
netty就是一个处理数据的,底层就是对NIO api的封装,达到百万并发级别,开发者不需要写建立连接等重复代码,而是交给netty框架执行,只需要自定义一些接口实现就行。
netty线程模型
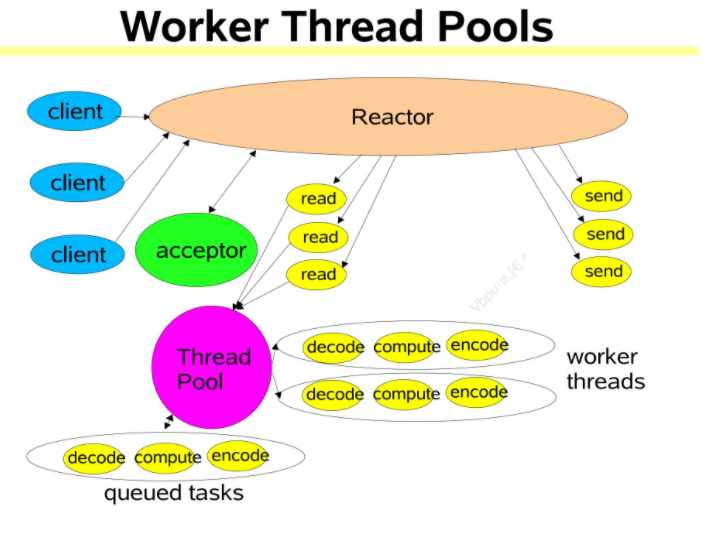
利用线程池处理事件,但是线程池也是有限的
AIO
NIO 2.0版本 异步非阻塞
一个有效请求对应一个线程,客户端的IO请求都是由OS完成后再通知服务器应开启线程处理。适用于连接数多且时间较长的应用
NIO BIO 比较
适用场景

1. NIO与IO的区别
NIO:New IO
1.4就有NIO了,1.7对NIO进行了改进。1.7对NIO的改动,称之为NIO2.NIO在现在企业中使用的比较多。
NIO的几个概念:
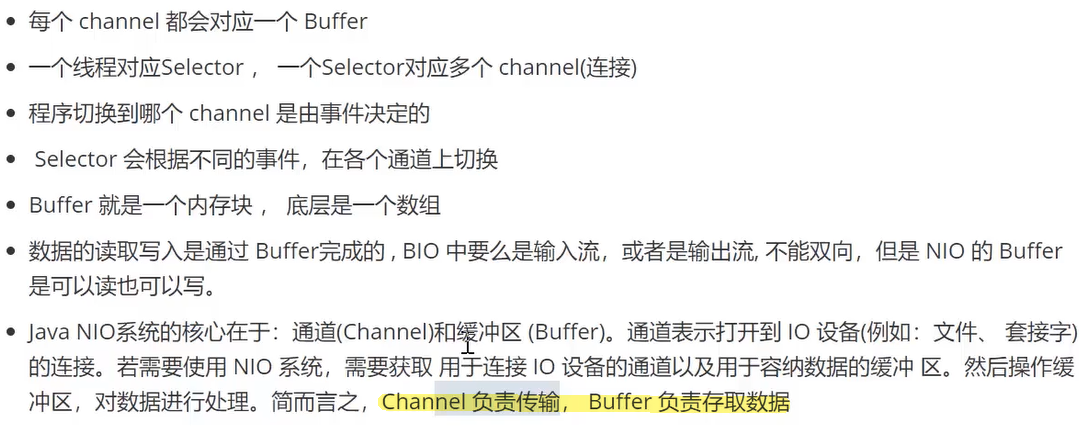
- 缓冲区
- 通道
- 选择器
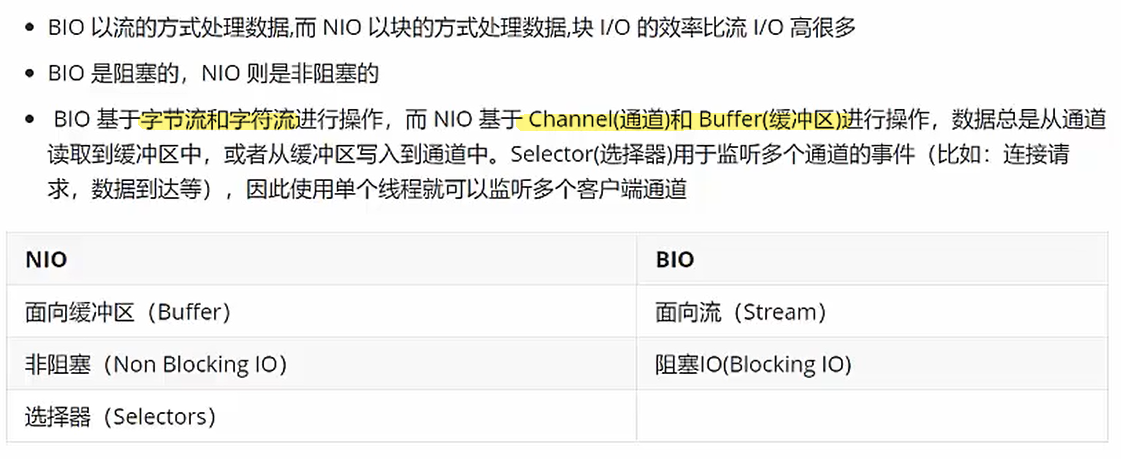
| IO | NIO |
|---|---|
| 面向流 | 面向缓冲区 |
原来的IO是面向流,是单向传输。
NIO是双向的传输。
2. 缓冲区
缓冲区(Bufffer):在JavaNIO中负责数据的存储。缓冲区就是数组。用于存储不同类型的数据。
根据数据的不同,提供了相应类型的缓冲区。(Boolean类型除外,其他的7个基本类型都有)
有:
ByteBuffer ; CharBuffer ; ShortBuffer ; IntBuffer ; LongBuffer ; FloatBuffer ; DoubleBuffer
上述缓冲区的管理方式都几乎一致。通过allocate();获取缓冲区
最常用的就是ByteBuffer
2.1. 缓冲区的基本属性
分配一个指定大小的缓冲区:
ByteBuffer byteBuffer = ByteBuffer.allocate(10);//获取一个10字节大小的缓冲区
从缓冲区存取数据的两个核心方法:
get();和put();byteBuffer.put("abcde".getBytes());//存5个Byte的数据
byterBuffer.get();缓冲区的几个核心属性:
- capacity:容量,表示缓冲区中最大的容量,一旦生命,不得改变!
- limit:界限,第一个不应该读取或写入的数据的索引,即位于 limit 后的数据 不可读写。缓冲区的限制不能为负,并且不能大于其容量。
- position:位置,表示缓冲区中正在操作数据的位置。(即将要操作的位置,position下的位置是空的)

- (position <= limit <= capacity)
2.2. flip方法(切换读数据模式)
flip方法:可以切换到读数据模式。
切换到读取模式的时候,即切换到读模式,则position变为0,limit变为数据最大的位置。


2.3. 读取Buffer数据
byteBuffer.flip();//切换到读模式 |
get完成之后,各个属性的位置变化情况为?
- position:变为读之前的limit
- limit:不变
- capacity:不变
2.4. Buffer常用方法

rewind:倒带,倒片。可重复读取数据,将position改为0。可以再次读取。
clear:清空,将buffer中的数据清空。将limit变为capacity,但是缓冲区的数据仍然在,数据处在被遗忘状态,只不过是将limit置为capacity,可以再次重新写入。
mark:标记。记录此时的position。
reset:把position恢复到上次mark的位置。
remaining:获取还可以操作的缓冲区的数量(即 limit - position)
hasRemaining:返回一个boolean值,是否还有剩余的位置可以读取
(即 return (limit - position) > 0 ? true : false;)
==总结,缓冲区的四个核心属性:==
0 <= mark <= position <= limit <= capacity
3. 直接缓冲区和非直接缓冲区
- 非直接缓存区:通过allocate() 方法分配缓冲区,将缓冲区建立在JVM的内存中。
- 直接缓冲区:通过allocateDirect() 方法分配缓冲区,将缓冲区直接建立在物理内存中。
可以提高效率
==直接缓冲区,只有ByteBuffer支持,其他Buffer不支持!==
非直接缓存区:

直接缓存区:

3.1. 创建两种缓冲区
ByteBuffer.allocate(1024);//创建非直接缓冲区 |
如何判断缓冲区是否为直接缓冲区?
byteBuffer.isDirect(); |
4. 通道
通道(Channel):由 java.nio.channels 包定义 的。Channel 表示 IO 源与目标打开的连接。 Channel 类似于传统的“流”。只不过 Channel 本身不能直接访问数据,Channel 只能与 Buffer 进行交互。
Java 为 Channel 接口提供的最主要实现类如下
- FileChannel:用于读取、写入、映射和操作文件的通道。
- DatagramChannel:通过 UDP 读写网络中的数据通道。
- SocketChannel:通过 TCP 读写网络中的数据。
- •ServerSocketChannel:可以监听新进来的 TCP 连接,对每一个新进来 的连接都会创建一个 SocketChannel
4.1 获取通道的三种方式:
Java针对支持通道的类提供了getChannel()方法来获取通道
支持通道的类如下:
- FileInputStream
- FileOutputStream
- RandomAccessFile
- DatagramSocket
- Socket
- ServerSocket
获取通道的其他方式是使用 Files 工具类的静态方法 newByteChannel() 获取字节通道。
或者通过通道的静态方法 open() 打开并返回指定通道。
(2和3都是JDK1.7以后的NIO2才支持这种方法)
第二种获取DirectBuffer的方式:使用FileChannel的map()方法将文件区域直接映射到内存中来创建。该方法返回 MappedByteBuffer 。
MappedByteBuffer mappedByteBuffer = inChannel.map(MapMode.READ_ONLY,0,inChannel.size()); |
4.2. 通过getChannel()获取通道
//获取文件流 |
4.3. 使用Channel的open()方法类获取通道
使用直接缓冲区完成文件的复制(内存映射文件)
MappedByteBuffer是内存映射文件,道理和ByteBuffer.allocateDirect();一摸一样。
MappedByteBuffer是在物理内存中。
内存映射文件,只有ByteBuffer支持。
映射的字节缓冲区及其表示的文件映射在缓冲区本身被垃圾收集之前保持有效。
映射字节缓冲区的内容可以随时改变,例如,如果该程序或其他程序改变了映射文件的相应区域的内容。 这些变化是否发生以及何时发生,取决于操作系统,因此未指定。
映射字节缓冲区的行为与普通直接字节缓冲区没有区别。
FileChannel inChannel = FileChannel.open(Paths.get("d:/1.mkv"), StandardOpenOption.READ); |
4.4. transferFrom和transferTo方法
- transferFrom ->
transferFrom(ReadableByteChannel src, long position, long count)
从给定的可读字节通道将字节传输到此通道的文件中。 - transferTo ->
transferTo(long position, long count, WritableByteChannel target)
将字节从此通道的文件传输到给定的可写字节通道。
FileChannel inChannel = FileChannel.open(Paths.get("d:/1.mkv"), StandardOpenOption.READ); |
5. 分散与聚集
- 分散(Scatter)
- 分散读取(Scatter Reads):将**==通道==中的**数据分散到多个缓冲区中

- 分散读取(Scatter Reads):将**==通道==中的**数据分散到多个缓冲区中
- 聚集(Gather)
- 聚集写入(Gather Writes):将多个缓冲区中的数据**聚集到一个==通道==**中

- 聚集写入(Gather Writes):将多个缓冲区中的数据**聚集到一个==通道==**中
==分散读取/聚集写入,都是按照顺序进行操作的==
5.1. 分散读取
RandomAccessFile raf = new RandomAccessFile("1.txt","rw"); |
5.2. 聚集写入
RandomAccessFile raf = new RandomAccessFile("1.txt","rw"); |
6. 字符集(Charset)编码与解码
- 编码:字符串转换成字节数组的过程
- 解码:字节数组转换成字符串的过程
Java中提供了Charset类(java.nio.charset.Charset)
Map<String,Charset> charsets = Charset.availableCharsets();//获取所有支持的编码。(构造从规范字符集名称到字符集对象的有序映射。 ) |
获取编码器和解码器:
Charset charset = Charset.fromName("GBK"); |
7. NIO的非阻塞式网络通信
- 传统的 IO 流都是阻塞式的。也就是说,当一个线程调用 read() 或 write() 时,该线程被阻塞,直到有一些数据被读取或写入,该线程在此期间不 能执行其他任务。因此,在完成网络通信进行 IO 操作时,由于线程会 阻塞,所以服务器端必须为每个客户端都提供一个独立的线程进行处理, 当服务器端需要处理大量客户端时,性能急剧下降。
- Java NIO 是非阻塞模式的。当线程从某通道进行读写数据时,若没有数 据可用时,该线程可以进行其他任务。线程通常将非阻塞 IO 的空闲时 间用于在其他通道上执行 IO 操作,所以单独的线程可以管理多个输入 和输出通道。因此,NIO 可以让服务器端使用一个或有限几个线程来同 时处理连接到服务器端的所有客户端。
7.1. 选择器
选择器(Selector) 是 SelectableChannle 对象的多路复用器,Selector 可 以同时监控多个 SelectableChannel 的 IO 状况,也就是说,利用 Selector 可使一个单独的线程管理多个 Channel。Selector 是非阻塞 IO 的核心。
SelectableChannle 的结构如下图:

选择器的作用:当客户端发送的通道的数据完全准备就绪之后,选择器才会将该任务分配到服务端的一个或多个线程上。

也就意味着,当客户端的数据未准备就绪,服务端不会处理该任务,就不会占用线程。
更能利用CPU的资源
使用NIO完成网络通信的三个核心:
通道:负责连接
java.nio.channels.Channel
|—SelectableChannel|—SocketChannel |—ServerSocketChannel |—DatagramChannel |—Pipe.SinkChannel
|—Pipe.SourceChannel缓冲区:数据的存取
选择器:是SelectableChannel的多路复用器,用于监控SelectableChannel的IO状况
SelectionKey:选择件

TCP通信:
//客户端 |
UDP通信:
|
8. Pipe管道
管道(Pipe):Java NIO 管道是==2个线程==之间的**==单向数据连接==**。 Pipe有一个source通道和一个sink通道。数据会 被写到sink通道,从source通道读取。

|